Setting the Parameters
Specifying the Execution Settings
Depending on the computer used, you can greatly improve the performance by properly setting these deep learning execution settings.
EasyDeepOCR is based on eVision’s deep learning tools.
Use the method
ETextReader::SetExecutionSettings.NET Python to set the execution settings of these tools.It is not mandatory to set these execution settings. If they are not set, EasyDeepOCR tries to use the OpenVINO engine if available, otherwise it uses the default engine.
Warning
Changing the execution settings resets the initialization. You must call ETextReader::Initialize .NET Python afterward.
Warning
When using the TensorRT engine, the initialization may take a few tens of minutes, depending on the hardware configuration.
Building a Sample List
The class ESampleList .NET Python contains all the information about a “customer use case”.
An
ESampleList.NET Python is a list ofESample.NET Python, where eachESample.NET Python is associated with an image from the batch.The “texts of interest” are specified as
EText.NET Python, the output class of the methodETextReader::Read.NET Python.You can specify a
ERegion.NET Python inside anESample.NET Python corresponding to the region used to read the image withETextReader::Read.NET Python. It is particularly useful if the region where the “text of interest” lies is found by some pre-processing.
The best way to create an ESampleList .NET Python is through a graphical interface because you need to annotate the “texts of interest”. eVision Studio provides a widget to perform this annotation easily. Alternatively, you can also create the ESampleList .NET Python using the API.
Using eVision Studio
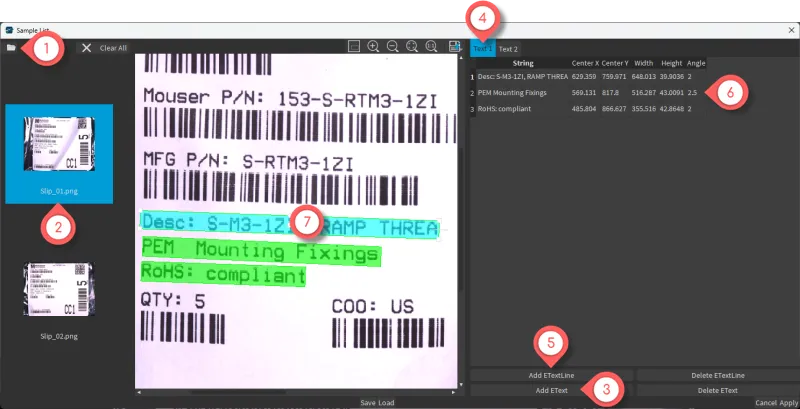
The eVision Studio widget for the edition of an ESampleList .NET Python
To manage your ESampleList .NET Python:
Open a file explorer to add one or several images to the batch.
An
ESampleis created for each image added to the batch.
Display the list of the
ESample.NET Python. TheESample.NET Python currently selected is highlighted.Create a new
EText.NET Python and add it to the selectedESample.NET Python.Display the list of
EText.NET Python for the selectedESample.NET Python. TheEText.NET Python currently selected is highlighted.Create a new
ETextLine.NET Python and add it to the selectedEText.NET Python.Display the list of
ETextLine.NET Python for the selectedEText.NET Python.Display the image of the selected
ESample.NET Python, overlaid with theETextLine.NET Python of the selectedEText.NET Python.
Using the API
The creation of the ESampleList .NET Python is illustrated in the code snippet below.
#include <eVision/EasyOcr/EasyDeepOCR/ESampleList.h>
using namespace eVision;
namespace EDO = eVision::EasyDeepOCR;
// Create an ESampleList
EDO::ESampleList sampleList;
// Create an ESample vector
std::vector<EDO::ESample> samples(1);
// Fill the ESample vector
for (EDO::ESample& sample : samples)
{
  // Set the image
  sample.SetImagePath("image.tif");
  // Create an EText vector
  std::vector<EDO::EText> texts(1);
  // Fill the EText vector
  for (EDO::EText& text : texts)
  {
    // Create an ETextLine vector
    std::vector<EDO::ETextLine> textLines(1);
    // Fill the ETextLine vector
    for (EDO::ETextLine& textLine : textLines)
    {
      // Adjust the ERectangle around the text line
      textLine.SetRectangle(ERectangle());
      // Annotate the text line
      textLine.SetString("");
    }
    // Set the ETextLine vector
    text.SetLines(textLines);
  }
  // Set the EText vector
  sample.SetTexts(texts);
}
// Set the ESample vector
sampleList.SetSamples(samples);
// ...
using eVision;
using EDO = eVision.EasyDeepOCR;
// Create an ESampleList
EDO.ESampleList sampleList = new EDO.ESampleList();
// Create an ESample vector
EDO.ESample[] samples = new EDO.ESample[1];
// Fill the ESample vector
foreach (EDO.ESample sample in samples)
{
  // Set the image
  sample.ImagePath = "image.tif";
  // Create an EText vector
  EDO.EText[] texts = new EDO.EText[1];
  // Fill the EText vector
  foreach (EDO.EText text in texts)
  {
    // Create an ETextLine vector
    EDO.ETextLine[] textLines = new EDO.ETextLine[1];
    // Fill the ETextLine vector
    foreach (EDO.ETextLine textLine in textLines)
    {
      // Adjust the ERectangle around the text line
      textLine.Rectangle = new ERectangle();
      // Annotate the text line
      textLine.String = "";
    }
    // Set the ETextLine vector
    text.Lines = textLines;
  }
  // Set the EText vector
  sample.Texts = texts;
}
// Set the ESample vector
sampleList.Samples = samples;
// ...
import eVision
from eVision import EasyDeepOCR as EDO
# Create an ESampleList
sampleList = EDO.ESampleList()
# Create an ESample vector
samples = [EDO.ESample()]
# Fill the ESample vector
for sample in samples:
  # Set the image
  sample.ImagePath = "image.tif"
  # Create an EText vector
  texts = [EDO.EText()]
  # Fill the EText vector
  for text in texts:
    # Create an ETextLine vector
    textLines = [EDO.ETextLine()]
    # Fill the ETextLine vector
    for textLine in textLines:
      # Adjust the ERectangle around the text line
      textLine.Rectangle = eVision.ERectangle()
      # Annotate the text line
      textLine.String = ""
    # Set the ETextLine vector
    text.Lines = textLines
  # Set the EText vector
  sample.Texts = texts
# Set the ESample vector
sampleList.Samples = samples
The
ESampleList.NET Python contains a singleESample.NET Python.This
ESample.NET Python contains a singleEText.NET Python that is composed of a singleETextLine.NET Python.
You can easily modify this code snippet to include more ESample .NET Python, EText .NET Python and ETextLine .NET Python.