EasyLocate - Locating Objects and Defects
To create an EasyLocate tool:
API:
To create an EasyLocate project in Deep Learning Studio:
Start Deep Learning Studio.
Create a new project and select
EasyLocate Axis Aligned Bounding BoxorEasyLocate Interest Pointin theNew deep learning projectdialog.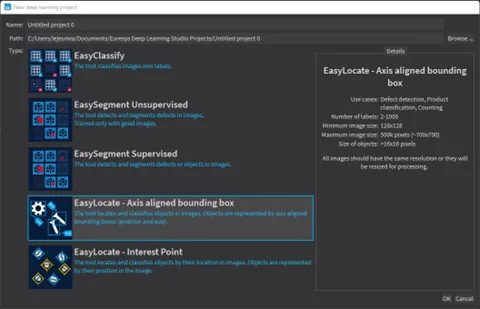
Creating an EasyLocate Axis aligned bounding box project.
Properties
Common Properties
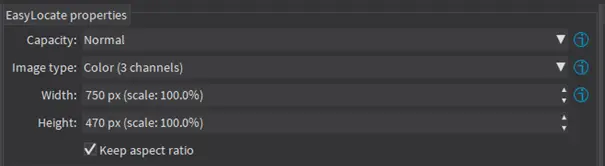
Properties common to the two modes
The EasyLocate tool has 3 main parameters:
The
Capacityof the neural network (default:Normal) represents the quantity of information it is capable of learning. A larger capacity makes the tool slower.In the API:
The capacity is represented by the enumerate type
ELocatorCapacity.NET Python.ELocatorBase::SetCapacity.NET Python sets the capacity of the tool.
The
Image type(default:Monochrome (1 channel)if the dataset contains only grayscale images, otherwisecolor (3 channels)):In the API:
To use monochrome (grayscale, 1 channel) images, set
ELocatorBase::SetChannels.NET Python to1.To use color (3 channels) images, set
ELocatorBase::SetChannels.NET Python to3.
The size of the images (
WidthandHeight). You must configure EasyLocate for a specific image size.The image must contain less than 500 000 pixels (about 707 × 707 pixels for a square image).
The width and the height must be at least 128 pixels.
The images are automatically resized to the specified size before EasyLocate processes them.
The lower the image size, the faster EasyLocate is.
EasyLocate works best with objects equal to or bigger than 16 × 16 pixels.
In Deep Learning Studio:
Use the
WidthandHeightcontrols to change the size of the images.Uncheck
Keep aspect ratioif you want to control the width and height independently of each other.By default, the width and height are set to the size of the images in the dataset. or, when they are bigger than 500 000 pixels, to the maximum possible size so that the aspect ratio of the image is kept and it contains at most 500 000 pixels.
A warning is displayed when the selected size makes the ground truth objects smaller than 16 × 16 pixels.
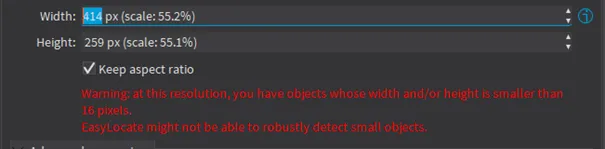
Warning when objects are too small.
In the API:
Use
ELocatorBase::SetWidth.NET Python andELocatorBase::SetHeight.NET Python to specify the image size.
Advanced Parameters
Axis Aligned Bounding Box
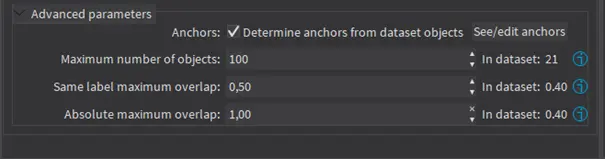
Advanced parameters for EasyLocate Axis Aligned Bounding Box.
The EasyLocate Axis Aligned Bounding Box tool has 4 advanced parameters linked to EasyLocate neural network design.
The EasyLocate neural network works as an image pyramid where the size of the input image is halved at each level. EasyLocate attempts to detect objects using one or more pyramid levels depending on the size of the objects to detect.
To do so, EasyLocate uses a set of typical object size, called anchors, that are assigned to pyramid levels according to their surface. Then, for each pixel and anchor of a pyramid level, EasyLocate predicts whether there is an object or not located around that pixel and whose size approximately matches the anchor.
EasyLocate then performs a post-processing on the prediction of the neural network. Indeed, the neural network can predict the same object several times using different levels of the pyramid, different anchors or neighboring positions in the image. EasyLocate keeps only the prediction with the highest probability and removes duplicates based on the overlap between objects.
The advanced parameters are:
The
Anchors. By default, the anchors are determined automatically from the objects in your dataset. The set of anchors must reflect the variety of object sizes that must be detected.To check or manually edit the anchors, click on
See/edit anchorsto open the following dialog: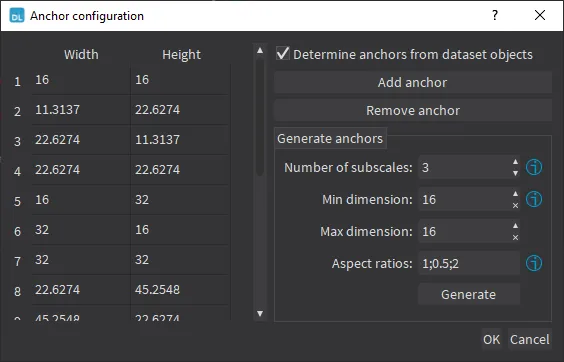
Anchor configuration.
The dialog lists the current anchors and enables the following operations:
To edit an existing anchor, double-click on its width or on its height in the list.
To add or remove an anchor, click on the corresponding button.
To generate a new set of anchors, specify the number of subscales, the minimum and the maximum dimensions of the anchors and one or more aspect ratios.
The dimension of an anchor is the square root of its surface and determines the pyramid level assigned to the anchor. The number of subscales represent the number of dimensions to generate for each pyramid level. For each of those dimensions, the anchors with the specified aspect ratios are generated.
Note
The anchors must be defined with respect to the width and height of the current tool. Thus, when specifying the anchors manually, the width and height parameters are locked.
In the API:
Use
SetPredictionAnchors.NET Python andGenerateAnchors.NET Python.
The
Maximum number of objects in an image. By default the value is 100. A lower value can speed up the post-processing of the results.In the API:
The
Same label maximum overlapis the maximum overlap between objects with the same label. By default the value is 0.5.In the API:
The
Absolute maximum overlapis the maximum overlap between objects, regardless of their label. By default the value is 1 and it means that the tool can predict two objects with different labels but with the exact same bounding box.In the API:
The overlap between two objects is their intersection over union (IoU), defined as the ratio between the surface of the intersection of their bounding boxes and the surface of the union of their bounding boxes.
Interest Point
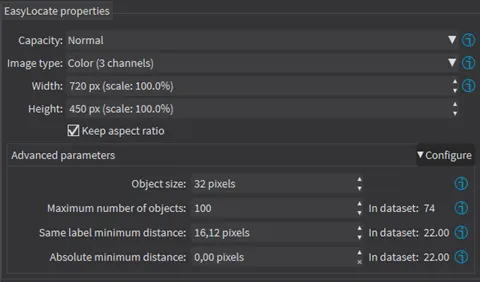
Advanced parameters for EasyLocate Interest Point.
The EasyLocate Interest Point tool has 4 advanced parameters.
The
Object sizeis the size of the objects that you want to detect in the image.By default, the value of this parameter is the object size specified for the dataset.
The object size has the same role as the anchors for Easy Locate Axis Aligned Bounding Box.
The object size is defined with respect to the size of the images in the dataset. When training a tool with a different input resolution, the object size parameters should not change (they are internally adapted according to the resolution of the training images and the width and height set for the tool).
In the API:
Use
SetObjectSize.NET Python
The
Maximum number of objectsin an image.By default the value is 100.
A lower value can speed up the post-processing of the results.
In the API:
The
Same label minimum distanceis the minimum distance between objects with the same label.By default the value is a third of the object size.
In the API:
The
Absolute minimum distanceis the minimum distance between objects, regardless of their label.By default the value is 0 and it means that the tool can predict two objects with different labels but with the exact same position.
In the API:
Training
To train your tool, see Training a Deep Learning Tool.
Validating the Results
The EasyLocate tool exposes 2 types of metrics. These object-based metrics quantify the performance of the tool :
At the object level.
At the image level. These metrics are related to the tool ability to correctly detect images without object and images with objects.
In Deep Learning Studio
The metrics are available in the
Validation and resultstab.Most metrics depends on the value of the
Detection threshold.
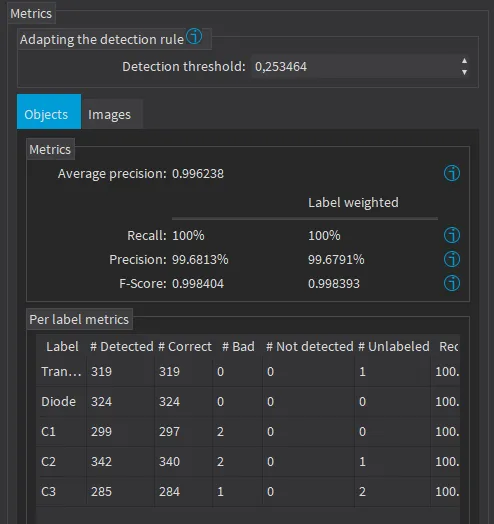
Objects metrics
In the API:
The metrics are represented by an
ELocatorMetrics.NET Python object.
The Object-Based Metrics
The object-based metrics are computed by matching actual, ground truth objects to detected objects.
A ground truth object and a detected object are matched together if:
They have the same label.
With EasyLocate Axis Aligned Bounding Box:
Their overlap (“Intersection over Union”) is higher or equal to the
Same label maximum overlapparameter of the tool.There is no other ground truth that has a higher overlap with the detected object and there is no other detected object that has a higher overlap with the ground truth object.
With EasyLocate Interest Point:
Their distance is lower than the
Same label minimum overlapparameter of the toolThere is no other ground truth that has a smaller distance with the detected object and there is no other detected object that has a smaller distance with the ground truth object.
The object-based metrics are:
The
Average precision(AP) is the average of the precision (proportion of detected objects that are matched to a ground truth objects) for different values of recall (true positive rate, proportion of ground truth objects that are matched to detected objects) obtained by varying theDetection threshold.Its value is between 0 (bad detector) and 1 (good detector).
It is a standard metric for evaluating object detector.
The
recall, also called the “true positive rate”, is the proportion of ground truth objects matched with a predicted object.The
weighted recallis the weighted average of therecallfor each label.The
precision, also called the “positive predicted value”, is the proportion of predicted objects matched with a ground truth object.The
weighted precisionis the weighted average of theprecisionfor each label.The
F-Scoreis the harmonic mean of the recall and theprecision.The
weighted F-Scoreis the weighted average of theF-Scorefor each label.The
Per label metricstable shows various metrics of the objects of each label. The columns starting with a “#” indicate the number of objects in the corresponding category.Selecting one or more cells from these columns filters the image list to show only the images that have objects falling in the corresponding categories.
If there is no selection, all the images are listed.
Use CTRL+LeftClick to add cells to the current selection.
The Image-Based Metrics
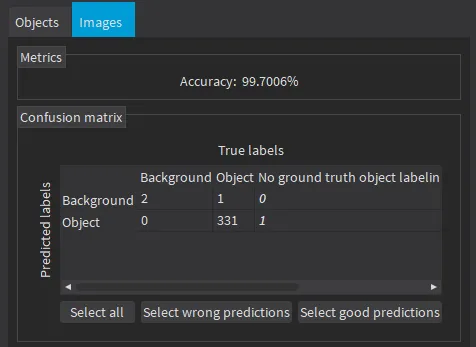
Image-based metrics.
The metrics related to the correct detection of the class of the images (background / with object or good / defective in the context of defect detection) are:
The
image detection accuracyis the proportion of images correctly predicted to have objects or not.A
Confusion matrixlisting the number of images in each category.Selecting one or more cells of the confusion matrix filters the image list to show only the images in the corresponding categories.
Applying the Tool to New Images
See also
Some eVision Studio samples illustrate inference with EasyLocate:
EasyLocate (bounding boxes): inference on theElectronicComponentsBagdataset.EasLocate (interest points): inference on theCeramicCapadataset.
See Additional Resources for details about the datasets and how to get them.
Deep Learning Studio
To apply EasyLocate to new images:
Include the new images in the test set
Add new images to the dataset from the
Dataset and annotationstab.In the
Validation and resultstab, refresh the results

Refreshing or computing new results.
Open the
Inference teststab to apply the segmenter to new images and display detailed results for these images.
To visualize the predicted objects of an image:
Open the
Resultsmenu (ALT+R) of the image viewer.Check the
Predictedobjects option (CTRL+P).
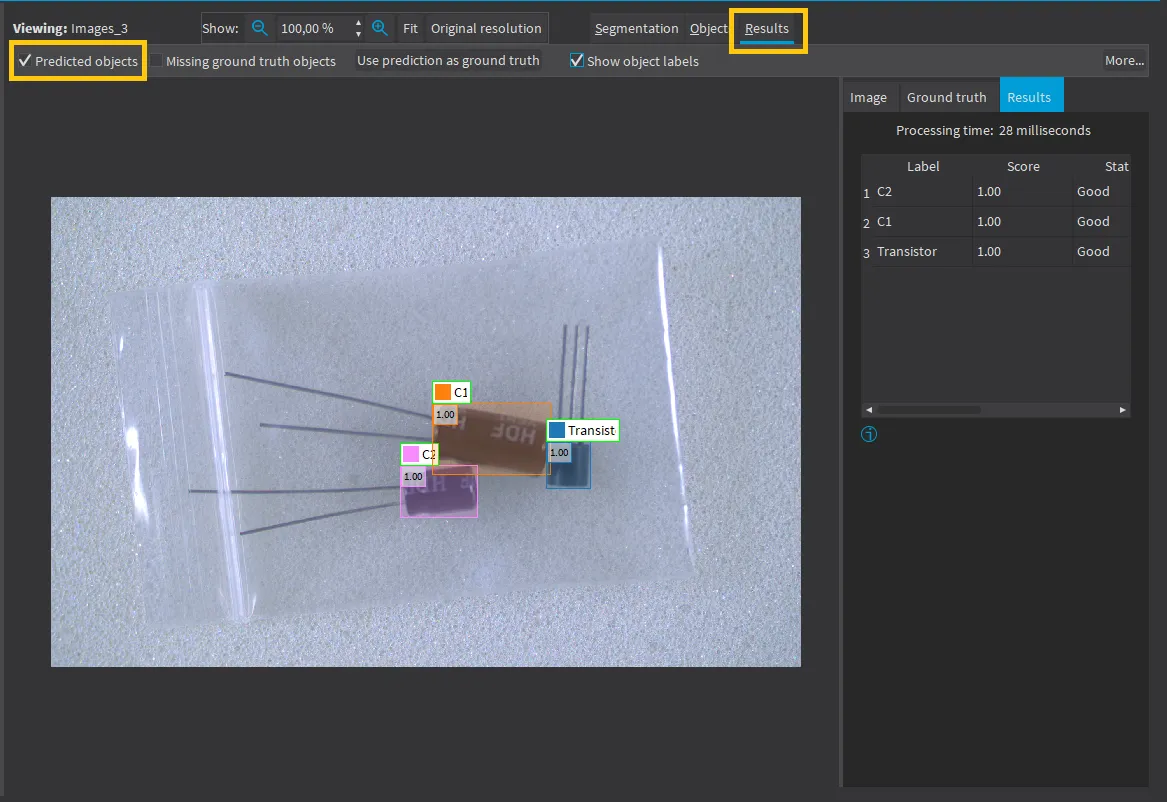
Visualize predicted objects. If the image has a ground truth, check the
Missing ground truth objectoption (CTRL+G) to display missing objects. They appear with a yellow pattern drawn over it.In the
Resultstab on the right side:The list of detected objects shows their label, their score, whether they are matched to a ground truth object and their predicted bounding box or position.
To see how close a predicted object is to a ground truth object, select the object in the list on the right side of the image.
For EasyLocate Axis Aligned Bounding Box, the ground truth object is displayed on top of the predicted object with the following color code:
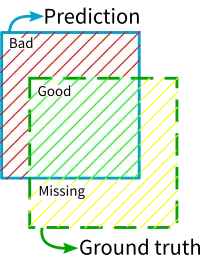
Prediction and ground truth color coding.
To accept all the predicted objects as ground truth:
Click on the
Use prediction as ground truthbutton (CTRL+U).Note that it removes any previous ground truth object already present in the image.
To accept a single predicted object as ground truth:
Right click on the object.
Select
Accept into ground truthin the menu.
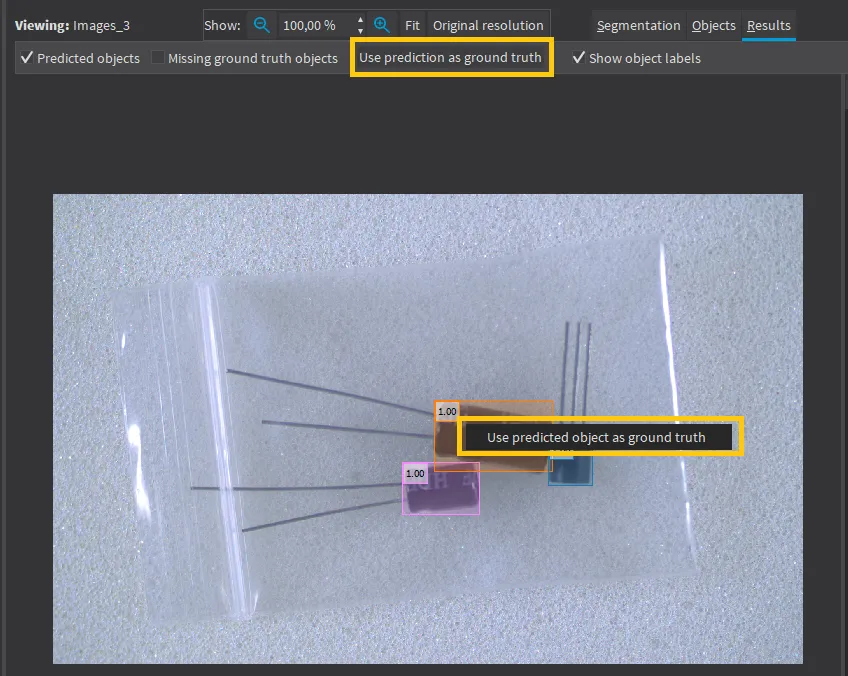
Import predicted objects as ground truth objects.
API
To apply EasyLocate to an image, use
ELocatorBase::Apply.NET Python.This method returns an object
ELocatorResult.NET Python.Use
GetDetectedObjects.NET Python to retrieve the predicted objects as an array ofELocatorPredictedObject.NET Python.With EasyLocate Axis Aligned Bounding Box, for each predicted object, use:
GetPositionX.NET Python to get the X coordinate of the center of the bounding box.GetPositionY.NET Python to get the Y coordinate of the center of the bounding box.GetOrgX.NET Python to get the X coordinate of the top left origin of the bounding box.GetOrgY.NET Python to get the Y coordinate of the top left origin of the bounding box.GetProbability.NET Python to get its predicted probability.
With EasyLocate Interest Point, for each predicted object, use:
GetPositionX.NET Python to get the X coordinate of the object.GetPositionY.NET Python to get the Y coordinate of the object.GetProbability.NET Python to get its predicted probability.
Note
Use GetLocatorFeatures .NET Python to check if the result was computed by EasyLocate Axis Aligned Bounding Box or EasyLocate Interest Point.
The value of GetLocatorFeatures .NET Python is a combination (using the binary OR (|) operator) of one or more ELocatorFeature .NET Python values. It indicates the type of information predicted by the tool:
For EasyLocate Interest Point:
ELocatorFeature_Position.For EasyLocate Axis Aligned Bounding Box:
ELocatorFeature_Position | ELocatorFeature_Size.