Image Stitching
Basics
Sometimes a single camera field of view isn’t large enough to capture an entire subject. In these cases, the camera is repositioned, often in a grid pattern, to acquire multiple overlapping images. These images are then combined through a process called image stitching, producing a final image that looks as if it were captured in a single shot.
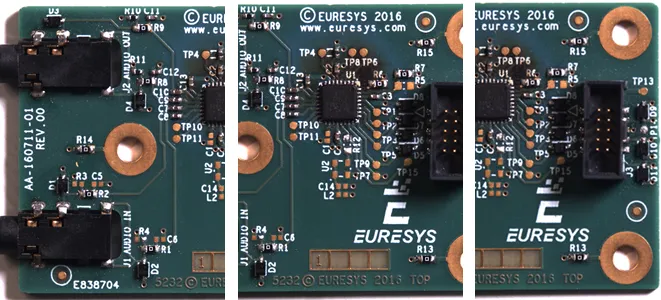
Image stitching example. Three image acquisitions that can be combined into one.
Use the class
EImageStitcher.NET Python to perform the stitching:Use your already loaded and properly calibrated patches as inputs in an arbitrary order.
The patches do not need to be aligned (they can be arbitrarily rotated).
All input images must have the same resolution.
#include <eVision/EasyImage/EImageStitcher.h>
using namespace eVision;
// Create the stitcher class
EImageStitcher stitcher;

// EImageC24 can be used instead of EImageBW8
// Patchs is a vector of image where each image is calibrated
std::vector<EImageBW8> patchs;
EImageBW8 output;

stitcher.Stitch(patchs, output);
using eVision;
using System.Collections.Generic;
// Create the stitcher class
EImageStitcher stitcher = new EImageStitcher();

// EImageC24 can be used instead of EImageBW8
// Patchs is a vector of image where each image is calibrated
List<EImageBW8> patchs = new List<EImageBW8>();
EImageBW8 output = new EImageBW8();

stitcher.Stitch(patchs.ToArray(), output);
import eVision
# Create the stitcher class
stitcher = eVision.EImageStitcher()

# EImageC24 can be used instead of EImageBW8
# Patchs is a vector of image where each image is calibrated
patchs = []
output = eVision.EImageBW8()

stitcher.Stitch(patchs, output)
The final image is:
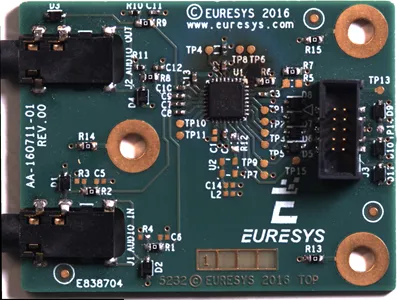
Result of the basic stitching operation.
Reference Image
If your set of patches contains images with significantly different rotations, you can specify a reference image.

Example of a less trivial image stitching example: some images are rotated.
Without specifying a reference image, the result image may appear unaligned. This is due to the EImageStitcher .NET Python choosing a reference image using a best-effort heuristic which can sometimes choose a rotated image.

Result without a specified reference image.
To avoid this behavior, specify the given patch to be used as the reference image.
The reference image is stitched onto the final image with no rotation, scale or skew.
With the car picture set, the reference image is set as 1.

Reference image, having an index of 1 in the list of submitted patches.
The corresponding code is:
#include <eVision/EasyImage/EImageStitcher.h>
using namespace eVision;
// Create the stitcher class
EImageStitcher stitcher;

// EImageBW8 can be used instead of EImageC24
// Patchs is a vector of image where each image is calibrated
std::vector<EImageBW8> patchs;
EImageBW8 output;

// If a base image is required
stitcher.StitchWithReferenceImage(patchs, output, 1);
using eVision;
using System.Collections.Generic;
// Create the stitcher class
EImageStitcher stitcher = new EImageStitcher();

// EImageC24 can be used instead of EImageBW8
// Patchs is a vector of image where each image is calibrated
List<EImageBW8> patchs = new List<EImageBW8>();
EImageBW8 output = new EImageBW8();

stitcher.Stitch(patchs.ToArray(), output);

// If a base image is required
stitcher.StitchWithReferenceImage(patchs.ToArray(), output, 1);
import eVision
# Create the stitcher class
stitcher = eVision.EImageStitcher()

# EImageC24 can be used instead of EImageBW8
# Patchs is a vector of image where each image is calibrated
patchs = []
output = eVision.EImageBW8()

stitcher.Stitch(patchs, output)

# If a base image is required
stitcher.StitchWithReferenceImage(patchs, output, 1)

Result of the image stitching operation. Photo by Swansway Motor Group on Unsplash.
Parameters
Warning
Due to the strict constraints applied during the stitching process (to ensure the validity of the possible measurements applied afterward), the class EImageStitcher .NET Python can fail to stitch certain sets of patches. The fail is an exception that can be caught programmatically.
Image Resolution
The resolution of the input images heavily influences the time required by the stitching operation as this time does not increase linearly, but rather exponentially.
If your use-case allows it, use input patches with a low resolution (for example, preprocessed with
EasyImage::Resize.NET Python).You can also use the parameter
EImageStitcher::SetFeatureScalingEnabled.NET Python described below.
FeatureScalingEnabled
With EImageStitcher .NET Python, the costliest operation is finding the feature points and an efficient way of cutting the time spent on this operation is to simply run the internal filter on a lower-resolution image.
In our internal tests, the majority of the stitching that works with EImageStitcher::SetFeatureScalingEnabled .NET Python sets to true also works with EImageStitcher::SetFeatureScalingEnabled .NET Python sets to false, while the opposite is not always true. Especially when the feature points used as a base for the stitching are already very small (down-sizing the input images would render them invisible).
Therefore, the parameter EImageStitcher::SetFeatureScalingEnabled .NET Python can help you achieve a better performance without sacrificing resolution:
Use
EImageStitcher::SetFeatureScalingEnabled.NET Python to scale down the input image and speed up the finding of its feature points.This does not affect the resolution of the output image as only the underlying computation is performed at a lower resolution.
This parameter may influence the overall precision of the stitching.
Grid Parameters
In most industrial cases, the position of the camera when the image is captured is approximately known. It’s especially true when multiple cameras are positioned in a grid (or when a single camera is repositioned in a grid).
If the patches are submitted to the stitching method row by row, the stitching method can leverage that information and produce better and faster results.
Warning
Specifying a grid increases the constraints applied when computing the affine matrix. The stitching method assumes that there are about no differences in the rotation and the scaling between patches.
The grid traversal is, by default, defined as row-major with the first patch being at the top right. The following figure explains it :
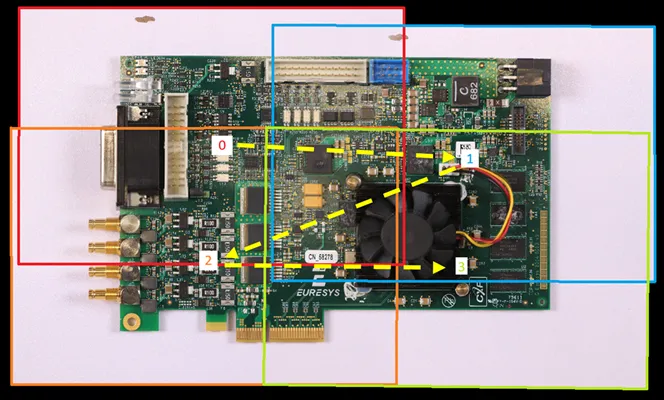
Grid traversal order illustration.
#include <eVision/EasyImage/EImageStitcher.h>
using namespace eVision;
// Create the stitcher class
EImageStitcher stitcher;

// EImageBW8 can be used instead of EImageC24
// Patchs is a vector of image where each image is calibrated
std::vector<EImageBW8> patchs;
EImageBW8 output;

// Incremental mode with a grid
stitcher.StartIncrementalStitching(EImageType_BW8, 2, 2);
stitcher.ProcessImage(EImageBW8());
stitcher.ProcessImage(EImageBW8());
stitcher.ProcessImage(EImageBW8());
stitcher.ProcessImage(EImageBW8());
stitcher.FinalizeIncrementalStitching(output);
using eVision;
using System.Collections.Generic;
// Create the stitcher class
EImageStitcher stitcher = new EImageStitcher();

// EImageC24 can be used instead of EImageBW8
// Patchs is a vector of image where each image is calibrated
List<EImageBW8> patchs = new List<EImageBW8>();
EImageBW8 output = new EImageBW8();

// Incremental mode with a grid
stitcher.StartIncrementalStitching(EImageType.BW8, 2, 2);
stitcher.ProcessImage(new EImageBW8());
stitcher.ProcessImage(new EImageBW8());
stitcher.ProcessImage(new EImageBW8());
stitcher.ProcessImage(new EImageBW8());
stitcher.FinalizeIncrementalStitching(output);
import eVision
# Create the stitcher class
stitcher = eVision.EImageStitcher()

# EImageC24 can be used instead of EImageBW8
# Patchs is a vector of image where each image is calibrated
patchs = []
output = eVision.EImageBW8()

# Incremental mode with a grid
stitcher.StartIncrementalStitching(eVision.EImageType.BW8, 2, 2)
stitcher.ProcessImage(eVision.EImageBW8())
stitcher.ProcessImage(eVision.EImageBW8())
stitcher.ProcessImage(eVision.EImageBW8())
stitcher.ProcessImage(eVision.EImageBW8())
stitcher.FinalizeIncrementalStitching(output)
You can change this grid traversal to accommodate for different situation:
Change the starting corner that defines the grid position of the first image in the input image list.
Change the grid traversal that defines the order of the images into a 2D grid.
When using a 2 by 2 grid with a large overlap, the stitching can sometimes succeed even if the grid traversal is wrongly setup.
This is because the transformation to apply to a grid element has only a rotation and a constraint, and not a translation constraint.
This is especially visible when experimenting in eVision Studio.
GridOverlap
The parameters EImageStitcher::GetGridOverlapX .NET Python and EImageStitcher::GetGridOverlapY .NET Python define the relative amount of surface that two adjacent patches share.
The best overlap depends on your image and your application. The chosen overlap can impact the precision. Moreover, it can also depend on the image resolution. For example, a 10% overlap for 256×256 images means finding feature points only in a band of 25 pixels. This overlap value is often known and should be therefore be set as is.
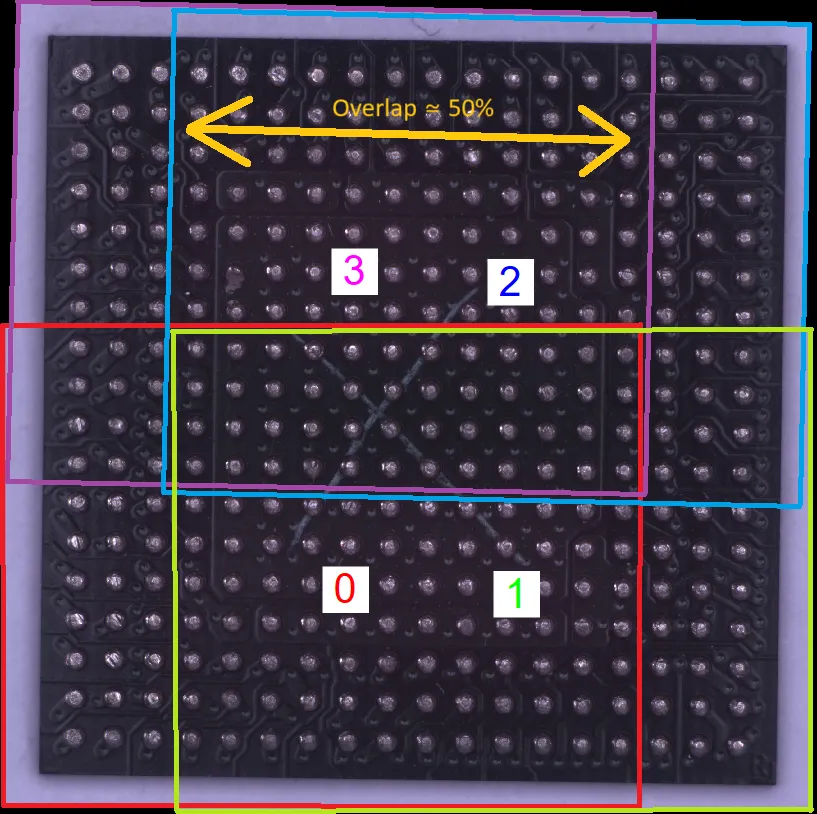
Overlap example.
Incremental Mode
The class EImageStitcher .NET Python offers an “incremental stitching” mode, designed to significantly speed up the stitching process.
This mode takes advantage of the fact that the physical camera takes a significant time to move between two points of view.
The speedup happens as the
EImageStitcher.NET Python overlaps the feature points computation and the patches transformation operation.Doing so can reduce the overall time required to stitch your images.
To use incremental stitching:
Initialize the stitching process:
Use
EImageStitcher::StartIncrementalStitching.NET Python to set up the incremental stitching mode.
Capture and process an image:
Capture an image.
Use
EImageStitcher::ProcessImage.NET Python with this image (this call is blocking and takes a significant time).
Repeat the capture and process step.
Once all images are captured and processed, finalize the stitching:
Use
EImageStitcher::FinalizeIncrementalStitching.NET Python to complete the stitching process.
Note
By using the incremental stitching, you can expect results identical to the traditional stitching method. However, you need to manage the multithreading externally in your application.
Stitching with Learning
Learning to stitch on a pattern with strong feature points to maximize the precision and then apply the stitching on images in production is a valid usage.
Note
See the eVision Studio sample where the EImageStitcher .NET Python is applied on a piece of tissue (with a low number of reliable feature points) after being learned on a pattern (with a high number of reliable feature points).
When the images to stitch do not have enough features (such as a very smooth surface, a piece of fabric…), it is possible to learn the transformations to apply on the input images from another set of images. Moreover, you can use the learning to make subsequent stitchings faster.
Hint
Make sure that the point of view for each image is strictly identical for the images given to the learn method and for the images given to the subsequent stitching calls.
Capture images of an easy-to-stitch subject.
In eVision Studio, the sample program
Image stitching with learninguses a flat sheet of paper containing primitive shapes.


Two images used to learn the transformation to apply in the stitching process. They involve multiple clear feature points (to the contrary of the subject to stitch who haven’t many).
Use the method
EImageStitcher::LearnBW8.NET Python orEImageStitcher::LearnC24.NET Python on these images.Once the learn is complete with your set of parameters, call
EImageStitcher::Stitch.NET Python with your hard-to-stitch images.In eVision Studio, the sample uses a piece of fabric (the same fabric as in the EasySegment sample).

Two images captured from a piece of fabric to stitch. They do not involve enough feature points to be stitched on their own, necessitating a learn.
Stitching with a Region
In some cases, unwarping an image (for example using EWorldShape .NET Python) leaves significant black regions.
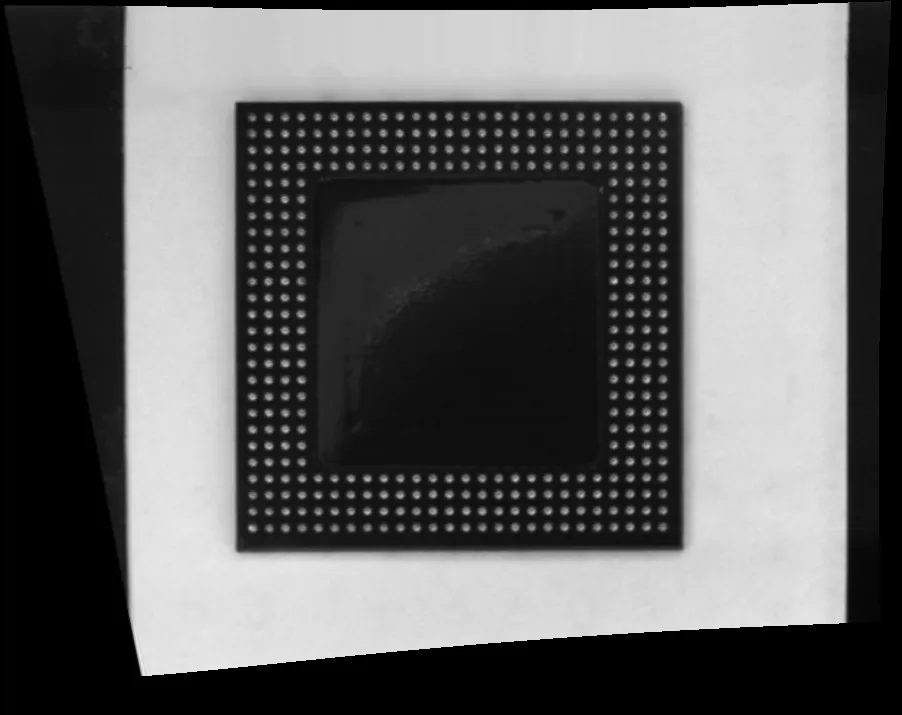
Unwarped image with black border regions.
These regions should not influence the stitching as they contain no actual data (all these black pixels are not present in the original image).
As of 25.10,
EWorldShape::Unwarp.NET Python can now output aERegion.NET Python that allows you to know if a pixel is a black pixel with no data (outside the region) or a pixel that is present in the original image.You can use these regions in the
EImageStitcher.NET Python.
Debugging
To better guide the debugging process, use the following methods to generate visualizations after a stitching operation (successful or not):
Use
EImageStitcher::DrawPoints.NET Python to draw, for a given image, the set of feature points used to stitch it.Use
EImageStitcher::DrawTransformations.NET Python to draw, for each stitched image, a transformed quadrangle (a quadrangle multiplied by the affine matrix used to stitch the image).
Multithreading
The stitching method can greatly benefit from multithreading.
If your use-case allows it, enable it using Easy::SetMaxNumberOfProcessingThreads .NET Python
See Also
Easy to understand, ready to copy code snippets.