EasyClassify - Multi-label Image Classification
EasyClassify is the deep learning classification library of eVision. It classifies images into a predefined set of classes. Use this tool to identify a product in an image or to detect if the product is good or defective.
API:
EClassifier.NET PythonTo create an EasyClassify project in Deep Learning Studio:
Start Deep Learning Studio.
Create a new project and select
EasyClassifyin theNew deep learning projectdialog.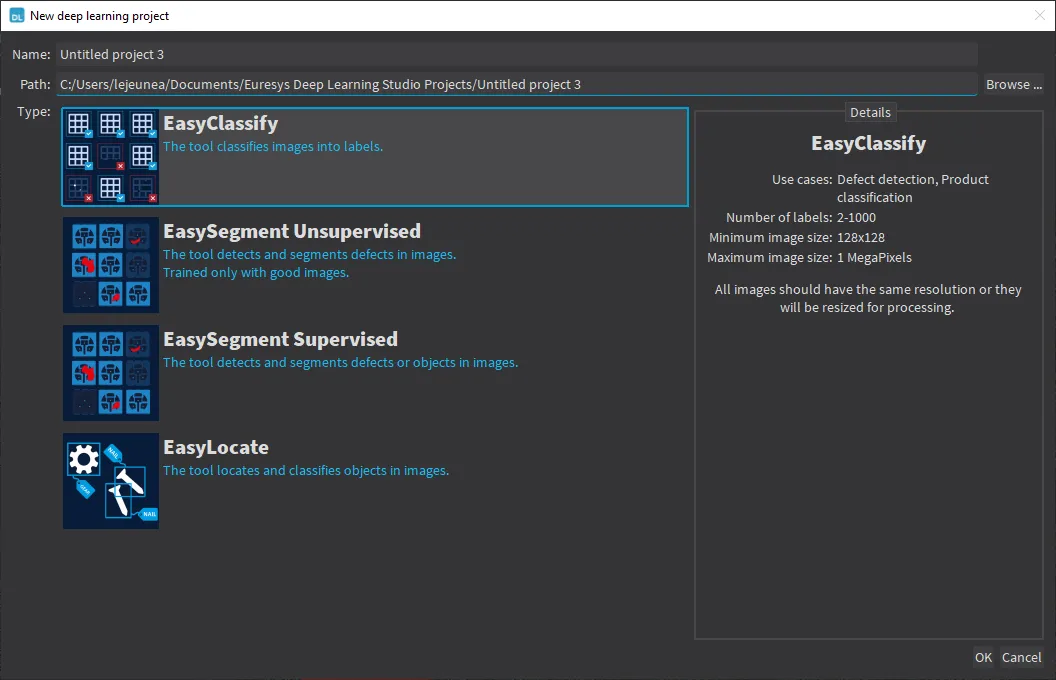
Creating an EasyClassify project.
Properties
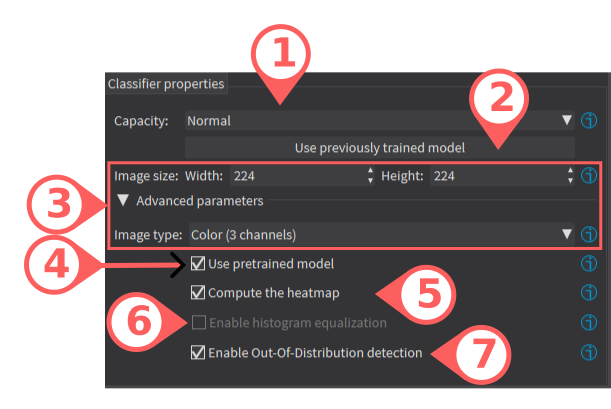
Capacity (1)
The
Capacityof the neural network (default:Normal) represents the quantity of information that it is capable of learning.We recommend you to first train a
Normalnetwork on your dataset.If the learning is working:
Try to use the
Smallor theLargenetwork to get the performance (inference speed and accuracy) that best matches your application.
If the learning does not work it means either that:
Your dataset image resolution is too small (below 128 × 128): try to use the
Extra Smallnetwork that specifically targets such cases.Your dataset is large and difficult: try to use the
Extra Largenetwork that specifically targets such cases.
In the API:
Use the string parameter
EClassifier::SetModelType.NET Python to select the model capacity.Use
EClassifier::SetModelType.NET Python to set the capacity of your tool.Use
EClassifier::GetAvailableModelTypes.NET Python to list the available models for training.
Using a Previously Trained Network for a New Training (2)
You can easily import a previously trained model and use it as the base of a new training.
Use this feature when you want to improve a model after adding several new images to the dataset used for its training.
In the API, use the method
EClassifier::LoadAsPretrained.NET Python.
Note
The difference between re-using a trained network and continuing a training on the same tool is that all training variables and the decision-making layers are reset, allowing the network to learn again.
Image Format (3)
The
Width,HeightandImage typecorresponds to the input image format of the neural network.By default, a classifier uses the 224 × 224 format which was used during the pre-training of the network. The image size has the following constraint:
Minimum: 128 x 128
Recommended: 224 x 224
Maximum: 1024 x 1024
The performances may start to deteriorate if the height or/and the width are smaller than the recommended size.
Your images will be automatically reformatted (anisotropic rescaling and conversion between color and grayscale) to this image format unless
EClassifier::SetEnableAutomaticImageReformat.NET Python is disabled. In this case, the classifier throws an exception if the images do not have the correct image format.In the API, you can also set manually the input image format with the methods
EClassifier::SetWidth.NET Python,EClassifier::SetHeight.NET Python andEClassifier::SetChannels.NET Python (1 channel for grayscale images and 3 channels for color images).
Note
For the best processing speed, use the lowest resolution above the recommended resolution at which your objects of interest are still recognizable.
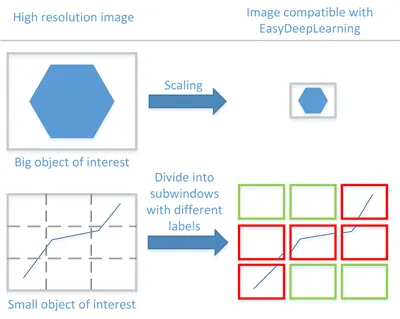
If your original images are larger than the maximum resolution, lower the resolution:
If the objects of interest are still recognizable, explicitly set the input image format of the classifier to this lower resolution.
If the objects of interest are not recognizable, divide your original images into sub-windows and use these sub-windows to train the classifier and make predictions. This presents the additional advantage of localizing the “object of interest” inside the original image.
Pretrained Models (4)
A pretrained model should give faster convergence time and better accuracy for all the datasets except for extremely large datasets (> 10 000 images).
A pretrained model works by initializing the neural network with the weights learned on a large and complex dataset.
This allows to transfer the knowledge of some universal features (such as edges, corners…) learned on this dataset to your dataset.
If you do not use a pretrained model, the neural network is initialized randomly.
In the API, use
EClassifier::SetUsePretrainedModel.NET Python to disable the user of pretrained models.
Note
You cannot use the histogram equalization with pretrained weights as it would lead to poor training results.
Heatmap (5)
If the option
Compute the heatmapis checked, the tool computes the heatmap along with each result.The heatmap is available with
EClassificationResult::GetHeatmap.NET Python.Note that this option makes the computation of the results a bit slower but twice faster than computing the result and then computing the heatmap separately.
In the API, use
EClassifier::SetComputeHeatmapWithResult.NET Python to enable or disable this option.If this option is disabled, use the method
EClassifier::GetHeatMap.NET Python to get the heatmap for an image.
Histogram Equalization (6)
The classifier can apply an histogram equalization to every input image.
Click on the
Enable histogram equalizationcheckbox to activate it.In the API, use
EClassifier::SetEnableHistogramEqualization.NET Python to activate it.
Note
You cannot use the histogram equalization with pretrained weights as it would lead to poor training results.
Out-Of-Distribution Detection (7)
The classifier can learn to detect out-of-distribution images. This allows the detection of previously unseen elements, such as new defects, lighting or position changes or wrong products.
The Out-Of-Distribution detection assigns a score to each image between 0 and 1. A higher score is correlated with a higher distance from the learned image distribution.
In Deep Learning Studio:
OOD is activated by default.
Deactivate it in the
Advanced parametersmenu.
In the API:
Use
EClassifier::SetComputeOODWithResult.NET Python to enable or disable OOD analysis (the OOD analysis is enabled by default).Use
EClassificationResult::IsOOD.NET Python to retrieve the OOD result.Use
EClassificationResult::GetOODScore.NET Python to retrieve the OOD score.Use
EClassificationResult::GetOODThreshold.NET Python to retrieve the corresponding threshold.
Note
The OOD scores can only be calculated in classifiers trained with the OOD detection enabled.
An existing model can learn the OOD parameters with EClassifier.LearnOODParameters() (the inputs of this method must be the same as the inputs used to train the classifier).
Training
To train your tool, see Training a Deep Learning Tool.
Validating the Results
Deep Learning Studio
The metrics are always computed without applying data augmentation on the images.
In the tab
Tools, the metricsBest validation errorandBest validation accuracyare computed during the training using the label weights. The evolution of several metrics during the training is also available.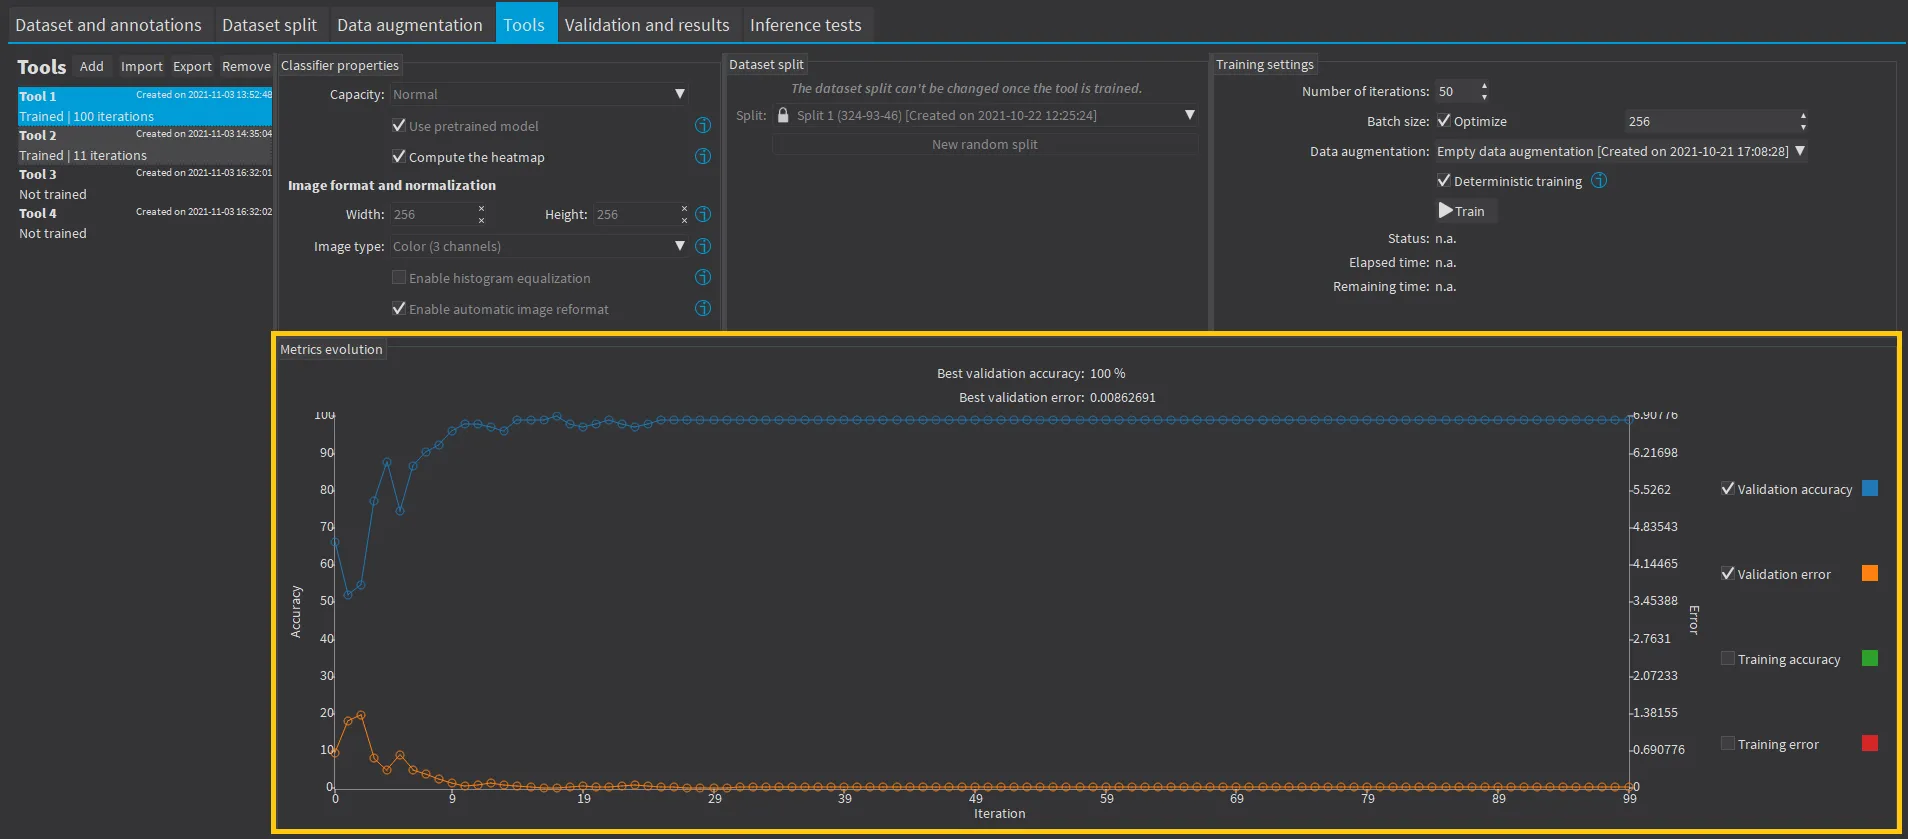
Evolution of metrics The results are available in the tab
Validation and Results.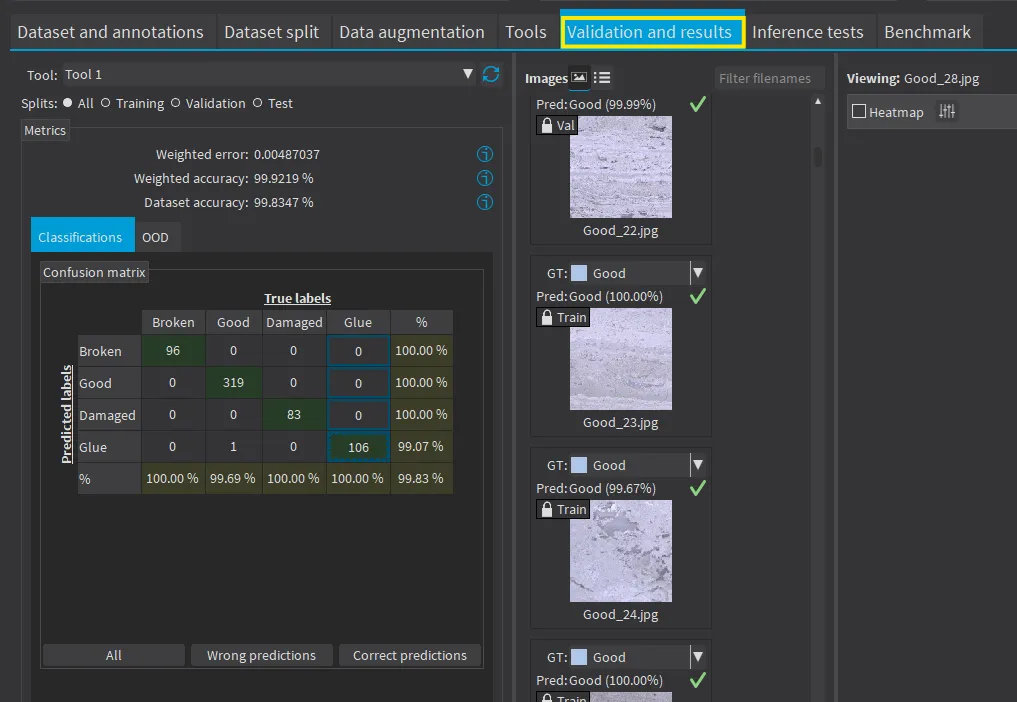
Evolution of metrics There are 3 metrics displayed:
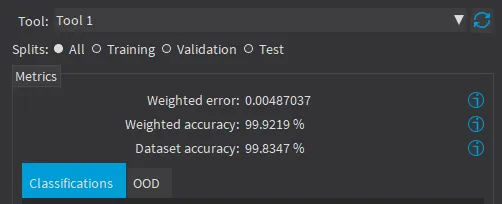
Validation metrics The
weighted errorand theweighted accuracy(normalized with respect to the label weights instead of being dependent of the number of images for each label).The
dataset accuracy(it does not use the label weights).
Note
If your dataset has a very different number of images for each of the labels, it is called unbalanced. In this case, the dataset accuracy is biased towards the labels containing the most images (the dataset accuracy mainly reflects the accuracy of these labels).
In the tab
Classification, the confusion matrix shows the number of images according to their true labels and their label predicted by the classifier.The diagonal elements of the matrix shown in green are the correctly classified images.
All the other elements of the matrix are badly classified images.
Select one or more elements of the matrix to show the corresponding images.
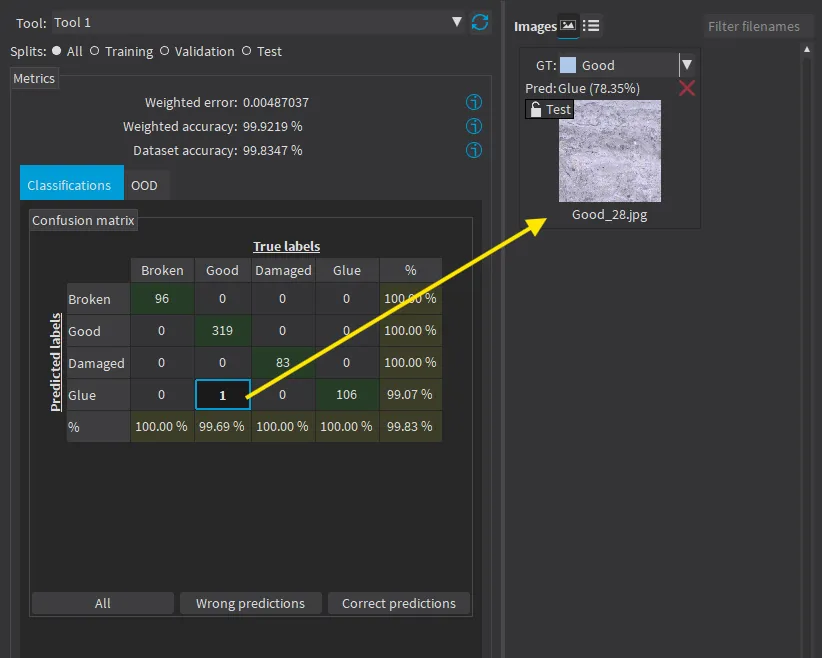
Filtering the image list with the confusion matrix
The tab
OODdisplays: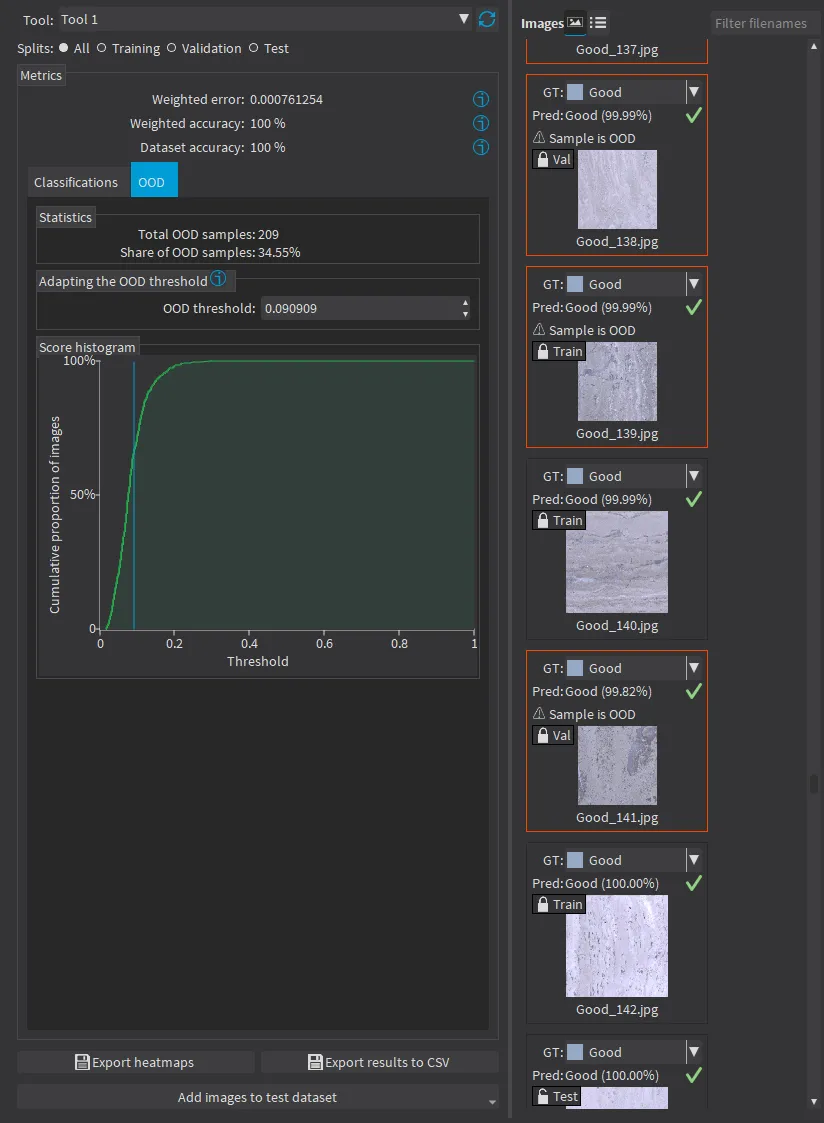
OOD result tab The number of samples that are identified as out of distribution.
The corresponding OOD threshold.
Note
If the default threshold value is not satisfactory, you can manually input a threshold in
Adapting the OOD thresholdor use the mouse to drag the threshold on the score histogram.Individual images identified as OOD are highlighted in red.
In the table, click on the cells and the headers to select OOD or non-OOD images and specific labels.
Use the button
Export heatmapsbelow the metrics widget to export the heatmap for each image of your dataset.The heatmaps are saved in the PNG format under the name
ImageName_ToolName_heatmap_UniqueId.png.This feature requires a Deep Learning license.
Use the button
Export results to CSVbelow the metrics widget to export the results for each image of your dataset as rows of a CSV file.Each record contains the image filename, the ground truth label, the predicted label, the prediction probability, the OOD detection result and the probabilities for all the labels recognized by the tool.

Export buttons
API
After the completion of each iteration, EasyClassify automatically computes several performance metrics about the training and validation dataset:
Call the methods
EClassifier::GetTrainingMetrics.NET Python andEClassifier::GetValidationMetrics.NET Python to read these metrics.The iterations are indexed between 0 and
EDeepLearningTool::GetNumTrainedIterations.NET Python-1.Call
EDeepLearningTool::GetBestIteration.NET Python to retrieve the iteration that produced the best performance.After the training, the classifier is back in the state corresponding to this best iteration.
The metrics are represented by an
EClassificationMetrics.NET Python object that contains the following performance metrics:The classification error (
EClassificationMetrics::GetError.NET Python), also called the cross-entropy loss: the quantity that is minimized during the training. It is computed from the probabilities computed by the classifier.The error for a single image is the negative of the logarithm of the probability corresponding to the true label of the image. So, if this probability is low, the error for the image is high.
The error of the dataset is the average of the errors of each image in the dataset.
The classification accuracy (
EClassificationMetrics::GetAccuracy.NET Python): the number of images correctly classified divided by the total number of images in the dataset.The confusion matrix (
EClassificationMetrics::GetConfusion.NET Python): the number of images labeled asgroundtruthLabelthat are classified aspredictedLabel.
Note
Call EClassifier::Evaluate .NET Python to evaluate a dataset independently of the training.
Classifying New Images
See also
Some eVision Studio samples illustrate aspects of EasyClassify:
Deep Learning Classification: classification and heatmap on theMiniWaffledataset.Out of distribution (OOD): Out of distribution detection on theStone Tilesdataset.
See Additional Resources for details about the datasets and how to get them.
Deep Learning Studio
Include the new images in the test set
Add new images to the dataset from the
Dataset and annotationstab.In the
Validation and resultstab, refresh the results
Refreshing or computing new results
Use the
Inference teststab to classify the new images and display the detailed results for these images.You can also export the results to CSV or export the heatmap from this tab.
In the image viewer, you can enable or disable the heatmap visualization and configure how the heatmap is displayed (color map and transparency).
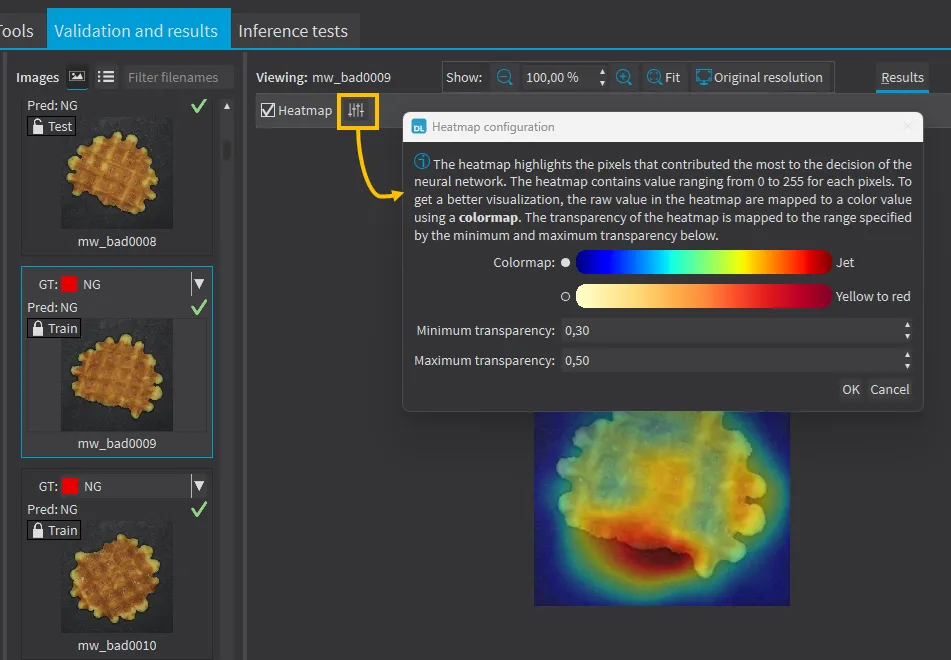
Heatmap visualization
API
Once the classifier is trained, call
EClassifier::Classify.NET Python to classify an eVision image. This method returns aEClassificationResult.NET Python object:EClassificationResult::GetBestLabel.NET Python returns the most probable label for the image.EClassificationResult::GetBestProbability.NET Python returns the probability associated with the most probable label.EClassificationResult::GetProbability.NET Python returns the probability associated with the given label.EClassificationResult::GetRanking.NET Python returns the ranking of the given label. The ranking goes from 1 (most probable) toEClassificationResult::GetNumLabels()(least probable).EClassificationResult::GetHeatmap.NET Python andEClassificationResult::GetColorizedHeatmap.NET Python return a heatmap highlighting the pixels that have contributed the most to get the most probable label.The heatmap is only available when the classifier property
EClassifier::SetComputeHeatmapWithResult.NET Python is set toTrue.Use
EClassificationResult::HasHeatmap.NET Python to check if the result contains a heatmap.
EClassificationResult::HasOODScore.NET Python returns whether the OOD score is available for the given result.If it is available,
EClassificationResult::IsOOD.NET Python returns a boolean that indicates whether the result is out of distribution.Use
EClassificationResult::GetOODScore.NET Python andEClassificationResult::GetOODThreshold.NET Python to retrieve the specific score and threshold.Use
EClassificationResult::SetOODThreshold.NET Python to manually change the threshold.
You can also do batch classification or directly classify a vector of eVision images:
Images are processed together in groups determined by the batch size.
On a GPU, it is usually much faster to classify a group of images than a single image.
On a CPU, implement a multithread approach to accelerate the classification. In that case, each thread must have its own instance of
EClassifier.NET Python (see code snippets).
Note
The batch classification has a tradeoff between the throughput (the number of images classified per second) and the latency (the time needed to obtain the result of an image): on a GPU, the higher the batch size, the higher the throughput and the latency. So, use batch classification to improve the classification speed at the cost of a longer time before obtaining the classification result of an image.
Use
EClassificationResult::GetHeatmap.NET Python to obtain a heatmap highlighting the pixels that contribute the most to a label.In some cases, this heatmap can provide a rough localization of the object corresponding to the label.
The heatmap is colored, and the important parts are displayed in red.
Note
Since large memory allocations take a lot of time, a classification does not release its memory and the next classifications can reuse it as long as the width, height, batch size and computation device remain the same. As such, the first classification is always slower due to the memory allocations.