Easy Spot Detector - Detecting Spots with Deep Learning
Operating Principle
Warning
Please note that EasySpotDetector is deprecated and will be removed in release 27.6.
Introduction
EasySpotDetector uses local segmentation to extract salient objects from the background, then a deep learning classifier can sort them. It is applicable to many materials like films, coated surfaces, steel, battery foils, glass…
Specific parameters allow you to select the aspect and the size of the defect, as well as the sensitivity of the detection. The segmentation is robust to noise and doesn’t require context training or calibration.
The main features are:
Detection of faint defects and contamination, even in noisy images
Fast processing for in-line inspection
Compatible with acquisition from line-scan and 2D cameras
Optional pre-alignment of the region of interest on the part edges
Optional deep learning classification of the defects
Simple and comprehensive C++, C# and Python API
Full featured tool, with samples
General Principle
EasySpotDetector performs a simple alignment of the Region of Interest (ROI) from an 8-bit gray scale image. This stage is optional.
The spots are extracted inside the ROI. Two types of spots are supported:
“Particle” for compact objects
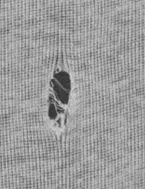
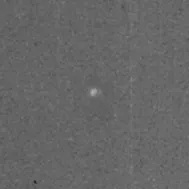
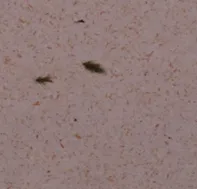
Examples of “particles”
“Scratch” for elongated objects

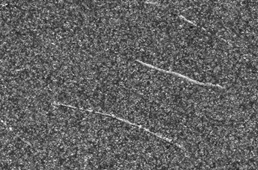
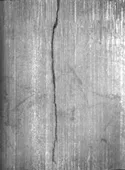
Examples of “scratches”
Optionally, you can invoke a deep learning classifier for each detected spot at production time.
This classifier produces a label and a probability for each spot.
Using Deep Learning Studio, you can train your own classifier, dedicated to your specific use case.
At development time, EasySpotDetector offers an API to easily populate a classification dataset with the detected spots.
You can open this dataset file in Deep Learning Studio for spot annotation and training.
EasySpotDetector uses the resulting model at production time to classify the detections.
Workflow
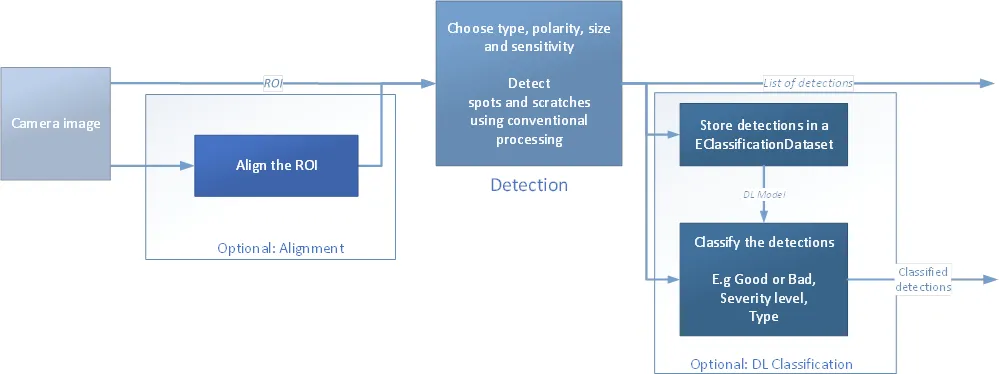
Workflow diagram
The Alignment
The alignment feature in EasySpotDetector is an optional step, before the detection of the spots. It aims to locate the part to process inside the image.
Hint
To restrict the processing domain in a more flexible and generic way, use the parameter Region of the ESpotDetector::Detect .NET Python method.
The alignment works by fitting an axis aligned rectangle to the object edges.
The nominal rectangle is defined by a center (X, Y) and a size (width and height).
A tolerance (in pixels) sets the search area inside and outside the nominal rectangle.
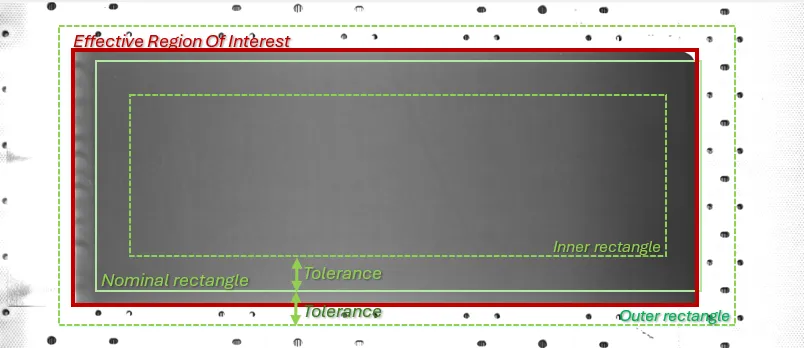
Explanation of the different terms related to the alignment.
EasySpotDetector searches the rectangle representing the effective ROI in the area between the inner and the outer nominal rectangles.
By default, the alignment is disabled.
Enable it with
ESpotDetector::SetEnableAlignment.NET Python.Configure the nominal rectangle with
ESpotDetector::SetAlignmentArea.NET Python.Set the tolerance with
ESpotDetector::SetAlignmentTolerance.NET Python.
The alignment process is designed to search a rectangle shape, with limited variations in position, size and orientation.
Use the parameter
Guard Bandto further adjust the ROI.The purpose of
Guard Bandis to exclude borders where detection artifacts could appear, due to non-uniformity, noise, fuzzy edges…Use the method
ESpotDetector::SetGuardBand.NET Python to set up the guard band parameters.
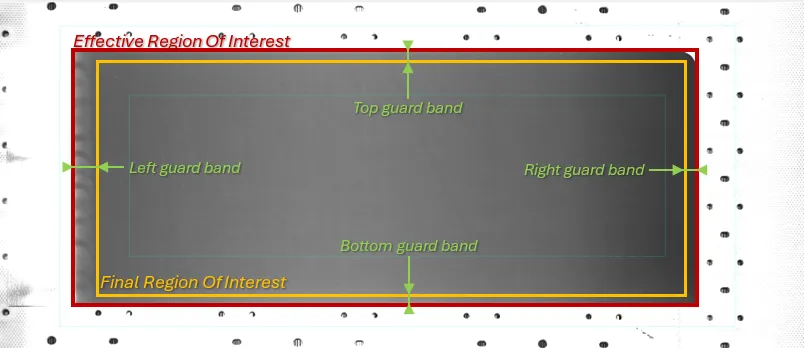
Explanation of the different terms related to the guard bands.
Detecting Particles and Scratches
EasySpotDetector detects particles and scratches by comparing the average local surroundings with the value of the center pixel. It performs this operation at various scales to segment large and small objects.
Note
The definition of the surroundings is different for particles detection and for scratches detection.
To operate the detection, use the method
ESpotDetector::Detect.NET Python with a gray scale image or an EROIBW8 as parameter. You can also use an optionalERegionto restrict the domain.The result is returned by
ESpotDetector::GetSpots.NET Python as a vector ofESpot.NET Python.An
ESpot.NET Python stores all the data about a detected object: type (particle or scratch), polarity (black or white), position and size, area (in pixels), strength (representing the contrast between the object and its surroundings), the pixel region…
Particle Detection
Examples of “particles”
To enable the detection of particles, use
ESpotDetector::SetEnableParticleDetection.NET Python.To configure the parameters controlling the detection, use
ESpotDetector::SetParticleDetectionParameters.NET Python:Polarity (
EParticleDetectionParameters::Polarity.NET Python): sets toBlack,WhiteorAny, depending on the gray values of the object compared to its surroundings (darker, lighter or both).Threshold (
EParticleDetectionParameters::Threshold.NET Python): the required gray scale difference between the object pixels and the object surroundings.A lower value means a higher sensitivity (detection of faint objects).
A higher value means a lower sensitivity (when the contrast between the objects and the background is significant).
Minimum and Maximum sizes (
EParticleDetectionParameters::MinSize.NET Python andEParticleDetectionParameters::MaxSize.NET Python): to select the detected objects based on their pixel size.The width and height of the oriented bounding box is considered.
To match the size criteria, the width or height must be larger or equal to the given minimum size and the width and height must be smaller or equal to the given maximum size.
Minimum area (
EParticleDetectionParameters::MinArea.NET Python): the minimum number of pixels of the object to be detected.
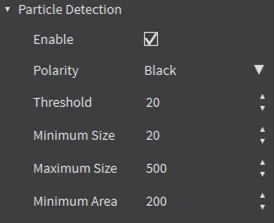
eVision Studio settings for the EasySpotDetector tool related to particle detection.
Scratch Detection
Examples of “scratches”
A scratch is an elongated object, with length largely greater than the width.
To enable the detection of scratches, use
ESpotDetector::SetEnableScratchDetection.NET Python.To configure the parameters controlling the detection, use
ESpotDetector::SetScratchDetectionParameters.NET Python:Polarity (
EScratchDetectionParameters::Polarity.NET Python): sets toBlack,WhiteorAny, depending on the gray values of the object compared to its surroundings (darker, lighter or both).Threshold (
EScratchDetectionParameters::Threshold.NET Python): the required gray scale difference between the object pixels and the object surroundings.A lower value means a higher sensitivity (detection of faint objects).
A higher value means a lower sensitivity (when the contrast between the objects and the background is significant).
Nominal width (
EScratchDetectionParameters::NominalWidth.NET Python): the typical width of the scratch (in pixels).Minimum length (
EScratchDetectionParameters::MinLength.NET Python): the minimum length (in pixels) to be considered as a valid scratch.
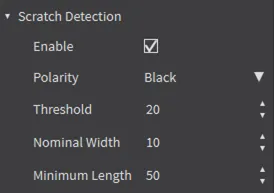
eVision Studio settings for the EasySpotDetector tool related to scratch detection.
Using a Deep Learning Classifier
After the detection of spots, you can submit them to a custom deep learning classifier.
You must train this classifier specifically for the inspection task (inspection of battery foil or fabric will have different classifiers). The purpose of this process is to get a class that represents/qualifies the object, for example:
To confirm or discard the detection.
To evaluate the severity of the defect.
To classify objects based on their aspect.

In the class
ESpotDetector.NET Python, use the methodESpotDetector::SetDLClassifierPath.NET Python to configure a deep learning classifier.All further detected spots are passed to this classifier.
The resulting label and probability are stored in the class
ESpot.NET Python (asESpot::GetDLLabel.NET Python andESpot::GetDLProbability.NET Python).
In EasySpotDetector, the typical workflow with a deep learning classifier is:
Gather samples of detected objects in a deep learning project.
Open the deep learning project in Deep Learning Studio to annotate the samples and train a new classifier.
Use the trained classifier at production time in EasySpotDetector.
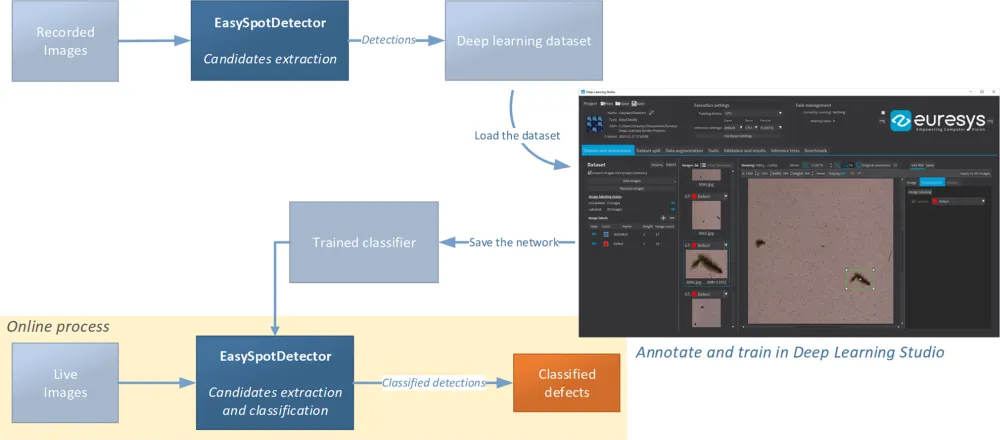
Workflow on training a specific deep learning classifier to work with EasySpotDetector.
After calling the method
ESpotDetector::Detect.NET Python, use the methodESpotDetector::AddDetectedSpotsToDLProject.NET Python to fill aEDeepLearningProject.NET Python with the newly detected spots:The image used by
ESpotDetector::Detect.NET Python is copied to the subdirectoryImagesand linked in the project.Note
Automatic image names are generated unless you set the parameter
imageName.All images must have a different name.
All the detected spots are added to the project as ROIs of the image, with a label depending on the spot type (particle or scratch).
Use the optional parameter
roiExtensionto increase the ROI size by a pixel amount. It could help the deep learning inference to have a ‘context’ around the ROI.Use the optional parameter
noDefectSamplesto set the number of extra ROIs added to the project and representing areas without defect. The label of these areas is given by the parameternoDefectLabel.
After adding enough spots to the deep learning project (depending on the context, between 20 and 200 samples per class are recommended), you can open the project with Deep Learning Studio.
Note
To annotate and train a deep learning classifier, see:
Deep Learning Tools - Inspecting Images with Deep Learning>Workflow.At production time, set the trained classifier tool with the method
ESpotDetector::SetDLClassifierPath.NET Python.
See Also
Easy to understand, ready to copy code snippets.