Calibration
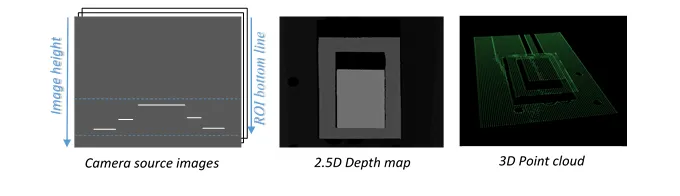
Calibration is used to apply the transformation between a depth map and a point cloud or a mesh.
There are 3 ways to set up this conversion:
Apply a simple scale on the pixel coordinates of the depth map (
EScaleCalibrationModel.NET Python class)Use the explicit geometric model (
EExplicitGeometricCalibrationModel.NET Python class)Use the object-based calibration approach (
EObjectBasedCalibrationModel.NET Python class)
These models share the same base class ECalibrationModel .NET Python and expose the method ECalibrationModel::Apply .NET Python, which is used to apply the conversion between a depth map pixel and a 3D point. It takes as input the coordinates of one point in a depth map and it returns the coordinates of the corresponding point in the 3D space.
The method ECalibrationModel::Apply .NET Python is not aware of the possible mirroring of the corresponding depth map and cannot make use of EDepthMap::SetAxisSystemType .NET Python (see below). If necessary (when the corresponding depth map is vertically mirrored) the \(y\) coordinates should be flipped before calling the Apply method.
The class
EDepthMapToPointCloudConverter.NET Python generates a point cloud from a depth map, using one of the calibration models.The class
EDepthMapToMeshConverter.NET Python generates a mesh from a depth map, using one of the calibration models.
By convention:
The origin of the referential is the lower-left corner of the depth map.
The center of the first pixel at the lower-left corner is at \(x = 0.5\) and \(y = 0.5\).
The center of the pixel at the upper-right corner is at \(x = \text{width} - 0.5\) and \(y = \text{height} - 0.5\), where \(\text{width}\) is the width of the depth map and \(\text{height}\) is its height.
Mirrored Depth Maps
By default, Easy3D considers that the origin of the 3D axis of the depth map is the bottom left of the internal image buffer, and the Y axis is pointing up. This means that the depth map image is not seen as vertically mirrored compared to the real world image of the scanned object.
Nevertheless, depending on your acquisition setup this mirroring can happen (for example if the direction of the scan is inverted).
If this is your case, you can set EDepthMap::SetAxisSystemType .NET Python to EAxisSystemType_CornerUpperLeft .NET Python, meaning that the origin of the 3D axis is on the upper left corner and the Y axis is pointing down.
This value changes the behavior of the methods :
Scale Calibration
The scale model (EScaleCalibrationModel .NET Python) only applies a simple factor on the X, Y and Z axis. These factors are the only parameters of EScaleCalibrationModel .NET Python.
For depth maps coming from laser triangulation setup, this transformation does not produce corrected, metric points. It’s main use is to display depth maps as 3D data with the E3DViewer .NET Python class.
Explicit Geometric Calibration
The explicit geometric model (EExplicitGeometricCalibrationModel .NET Python) defines a simple and ideal laser triangulation setup. The explicit calibration makes some strong assumptions on the setup geometry and can only be used when a minimum set of parameters are known:
The angles of the camera and the laser plane, in the counter clockwise direction. The camera angle must be positive.
The height of the camera above the scanned object.
The field of view of the camera defined by the sensor size (mm) and the optical focal length (mm).
The physical distance between two line scans of the depth map (depends on acquisition rate and motion speed).
The size of the image and the ROI origin used in laser line extraction (between the top (0) and the bottom (height) of the image).
Hint
Use the “Easy3D_Setup_Configuration.xlsx” spreadsheet to compute and check your setup configuration and parameters.
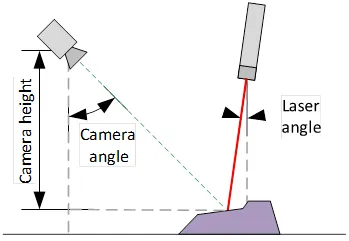
Explicit calibration setup with camera angle, laser angle and camera height
The setup of an explicit geometric calibration uses the constructor of the EExplicitGeometricCalibrationModel .NET Python class.
Object-Based Calibration
Object-based calibration gives real world, metric, coordinates from an arbitrary laser triangulation setup. From the scan of a reference object, the calibration process tries to calculate all the parameters required for the transformation to the world space (position and attributes of the camera, position of the laser plane, relative motion of the object, optical distortion…).
The calibration process generates a calibration model.
Easy3DLaserLine uses this calibration model to transform the laser profile scans (or depth maps) into metric, distortion free point clouds.
The calibration model includes all the geometric parameters required for this transformation:
The relative position of the laser and the camera.
The projection and the distortion model of the camera.
The relative motion of the object.
The Calibration Object
The general principle of Easy3DLaserLine calibration is to match a scan of a known calibration object to its true geometric dimensions.
The Truncated Double Pyramid
The dimensions of the “double truncated pyramid” calibration object the X-, Y- and Z-axes are named A, B and C respectively.
The design of the double truncated pyramid must follow the ratios given in the illustration below.
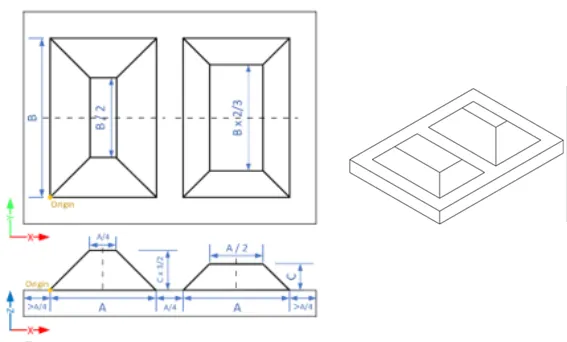
The “double truncated pyramid” calibration model (recommended)
For example, the provided CAD files of the calibration object use A = 4 cm, B = 6 cm and C = 1 cm. The Calibration Object Size, required for the calibration process, are the values A, B and C.
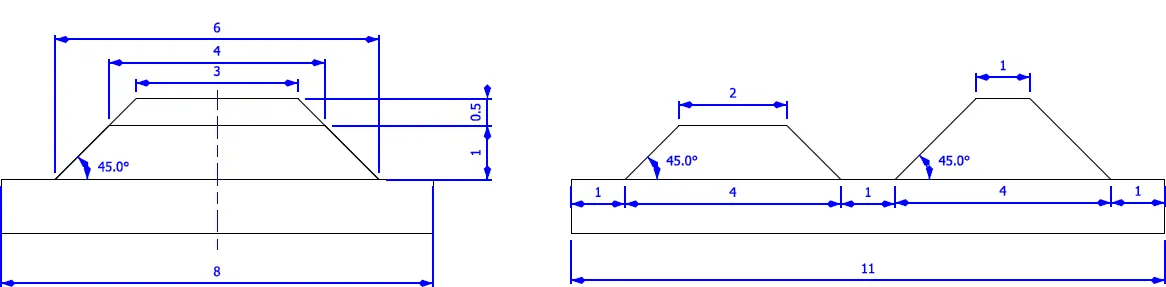
The “double truncated pyramid” calibration model with A = 4, B = 6 and C = 1
Building a Calibration Object
Overall Dimensions
Manufacture a calibration object that fits the working area of the project.
For example, if the project targets the inspection of a PCB (a printed circuit board as illustrated), design your calibration object with:
The dimension A or B (it does not matter) similar to the width of the PCB.
The height (C) of only several millimeters.
Hint
This is not a strict requirement, if the scanned object is slightly larger or smaller than the calibration object, the calibration process is still valid.
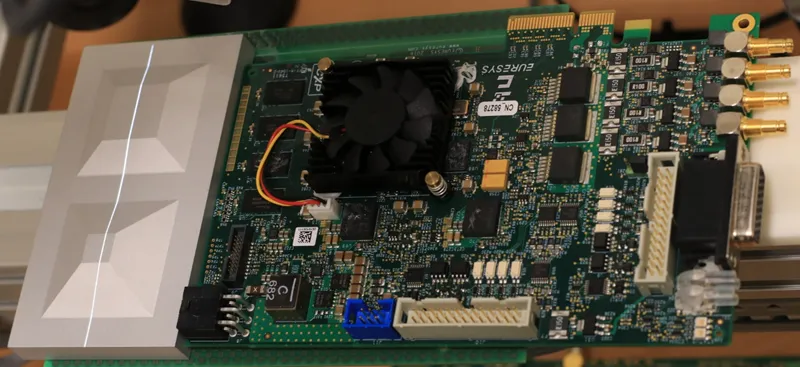
A PCB scanning setup with the associated calibration object. The calibration object dimensions (A, B and C) match the width and the height of the PCB
Hint
There is no constraint on the orientation of the calibration object during the scan:
The X-axis can be aligned with the motion direction or with the laser line.
After the calibration process, the origin and axes of the 3D calibrated point cloud follow the conventions of the reference design.
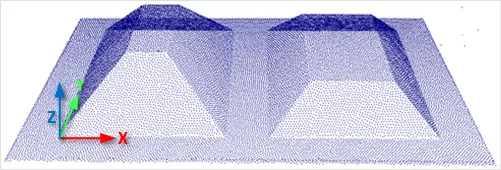
A calibrated point cloud with the origin and the axis of the coordinates system. The 3D origin is located at the external corner of the higher pyramid
Precision and Tolerance
The relevant dimensions of the calibration object are the width, the length and the height of the pyramids (called A, B and C in the illustrations).
The relative dimensions to A, B and C (B/2, A/4…) are important and you must execute them with the same precision.
The dimensional tolerances are related to the overall expected precision. If you want to achieve measurements on the point cloud with a precision of 0.01 mm, the manufacturing of the calibration object must have the same precision.
These tolerances only apply to the pyramids geometry, the calibration process does not use the dimensions of the support.
The planar surfaces must be flat between 2 parallel planes separated by the target tolerance, as illustrated.
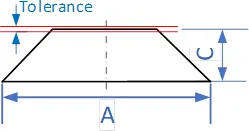
The tolerance of the pyramids sides is defined as the smallest distance between two parallel planes that contain the entire surface
Material and Surface Finishing
Hint
The goal is to obtain the laser profile as thinnest as possible over the whole object surface with the largest reflected energy.
The build material and the surface finishing are also important and must have:
A good reflectance, with diffuse reflection (no specular reflections).
No transmission and limited diffusion inside the material.
Hint
You can obtain a good surface finishing using aluminum material and blasting. Blasting gives the surfaces a satin gray finish.
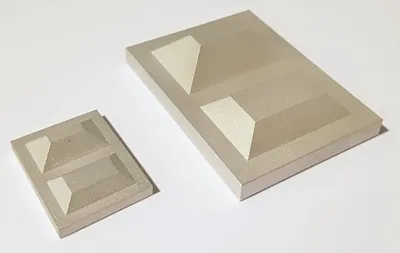
2 aluminum machined calibration objects with a micro-abrasive blasting surface treatment
3D CAD Models
The calibration object models are available in various 3D CAD formats like STEP, OBJ and STL.
Download these files from the download area in the Additional Resources section (www.euresys.com/Support).
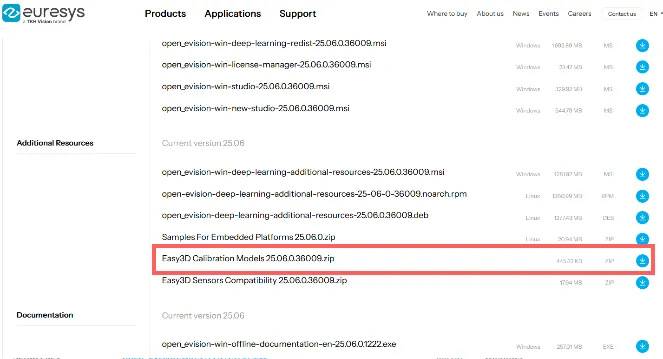
Download the calibration object models
Scanning the Calibration Object
The scan of the calibration object produces a depth map.
To ensure a correct detection of the calibration object and a precise calibration model, you must fulfill the following criteria:
All faces of the calibration object must be visible on the depth map (this affects the orientation of both the camera and the laser).
No other object can be higher than the calibration object in the depth map.
The depth map must have at least 200 \(\times\) 200 pixels.
The calibration object must cover at least 50% of the defined pixels of the depth map.
Examples of bad scans:
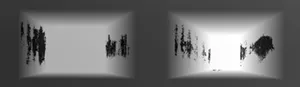
Missing pixels on the side faces

Not enough lines
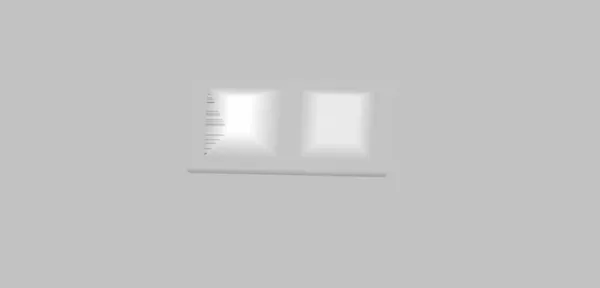
The calibration object is too small on the depth map
Using the Calibration with eVision
The class
EObjectBasedCalibrationModel.NET Python is the container for the object based calibration model.The class
EObjectBasedCalibrationGenerator.NET Python performs the computation of such a model using anEDepthMap8.NET Python/EDepthMap16.NET Python/EDepthMap32f.NET Python as input.
See also